Tuesday 18 October 2011

Week Twenty Four – Oversite and Over the Roof

Amazing progress this week. After so long with so little ostensibly happening, suddenly the floor base is going down and the roof is going back on.

The concrete base of the floor is called the oversite - not sure why. Something to do with the fact that it lies over the site perhaps. Damp proof course (DPC) sits under the concrete and also runs up the wall, as here in what will be the study.


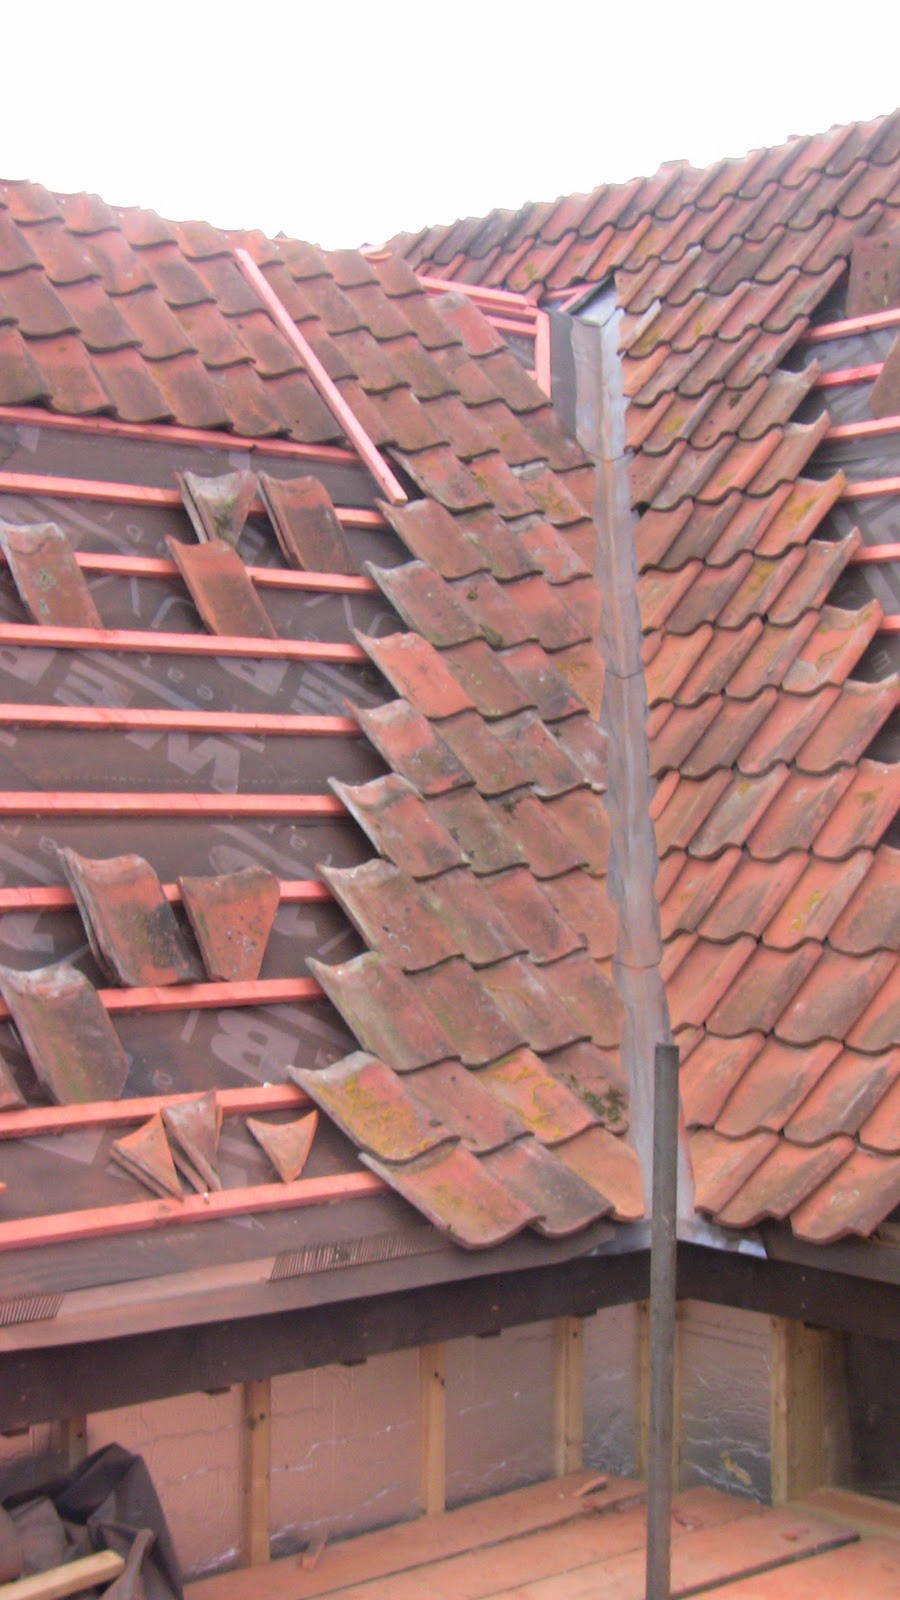
Up on the roof they're tiling the projections. Hip with no ridge tiles.

And a hip with ridge tiles being put in place.
The West roof has been tiled. You might be able to see some gaps around the tiles. We've been assured that that's normal for old tiles like ours. Most of the rain will still run down the top of the tiles but whatever gets underneath runs down the membrane below the tiles. Bit of a worry but I guess it works ...
They've put lead over the barge boards to protect them from the weather. Now they're ready for the capping boards.

Oversite being poured in the utility room


Levelling out the hogging ready for the whacker plate to do its stuff.


Had to ring around steel suppliers to find the best deal for sheets of reinforcing mesh. Our engineer has called for reinforcement of the oversite where it's laid over the chalk floor. We can't dig out the existing material and put down hardcore, as is done elsewhere, so there's nothing solid to pour the concrete onto - chalk it being too soft and crumbly. (Hardcore is just bits of broken brick, stone, lumps of concrete.) Consequently the oversite itself has to have enough tensile strength to bridge over any weak areas underneath. Which means reinforced concrete. Makes sense. And it means more cost in materials and time. Still, the chalk must be preserved for future generations to dig up and admire - once they've removed the steel reinforced concrete slab sitting on top of it.


The reinforcing mesh is laid over the over the DPC and the concrete for the oversite poured on top.  The mesh sits on spacers to ensure that steel ends up in the middle of the thickness of the oversite rather than at the bottom. You can buy suitably sized spacers - or you can just break up a paving slab and use that ...


The oversite is poured in sections and the sheets of reinforcing mesh are overlapped, or lapped, to provide continuity from one area to the next.


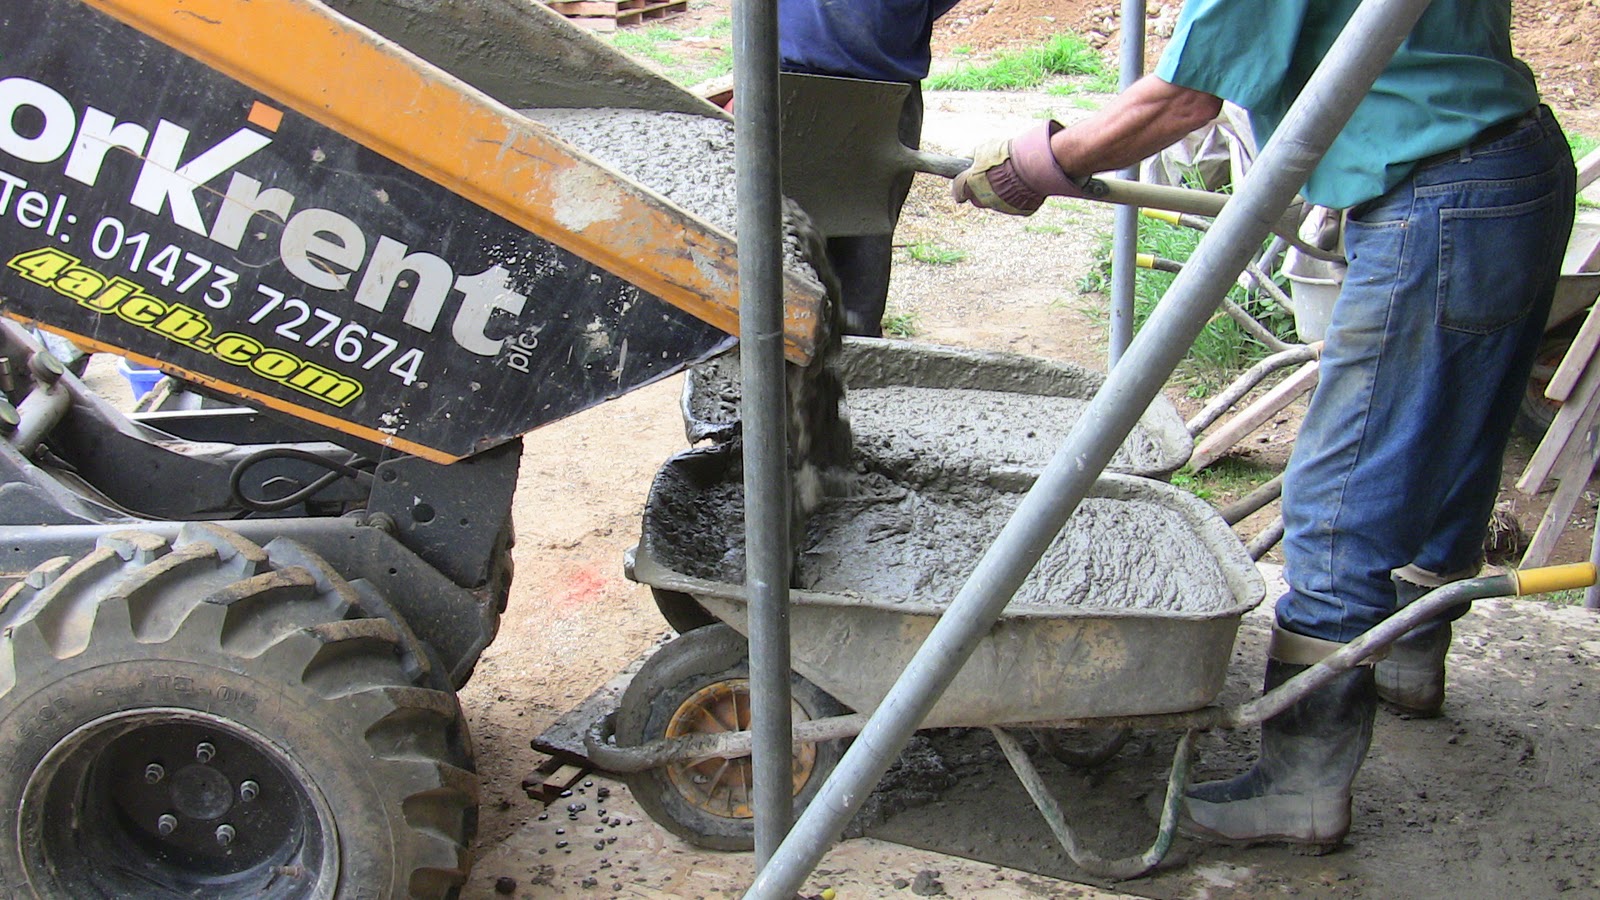
Double barrowed ? Using a dumper to fill two barrows. Half the time. I like it.


Oversite in family room. I wouldn't recommend walking on it just yet ...


Good idea to build in drains and ducts at this stage. But not sure I'd have thought of it.


We were asked if they should include dentals under the ridge tiles. We asked why and were told that it helps the structure and anyway is traditional around here.  OK?


Some of the ridge tiles were left unfixed to allow flue through, although we're not allowed to have  normal brick chimney sticking out of the roof and the the flue pipe must not come out through the apex of the roof.

Pretty patterns of the dumper tread marks on the chalk floor.


The dumper is used to ferry the cement into the barn. In places it can tip straight into the trench of onto the oversite. Where we can't get the dumper in the cement has to be transferred to barrows for the final few yards.


Hogging in the dining room


Tiles up on the scaffold ready to go on the roof. Seems ages ago that we were happily engaged drilling them.


Issues we've dealt with this week have included: need more pantiles because the roof is bigger and some of the tiles got damaged; procuring reinforcing mesh over chalk floor; investigating (and trying to understand the difference between jiffy and S type joist hangers; coming up with a design for the fireplace; we need to book EDF to come and move the meter and provide a proper supply to the barn.

And finally


Tuesday 11 October 2011

Week Twenty Three – Roof and Fireplace

BIG BIG milestone this week. Work began putting the pantiles back on the roof. The roofers insist on putting their own battens up - red, as you can see. Their battens are nailed onto the vertical battens laid by the builder.


There's a breather membrane under the tile battens. In the old days it would have been roofing felt, a thick black bituminous material. The breather membrane is supposed to be more efficient and longer lasting. We'll see.

Pantiles going on. Amazing. Not too sure why they're called pantiles rather than just tiles. Something to do with their curved shape I guess.


Battening the valleys is a bit of an art.


Followed by tiling the valleys

They made terrific progress, even starting to tile the west roof


Could almost be a heart - or am I just an incurable romantic. Still, it's in the eye of the beholder ...


Under the bottom row of tiles they put a sort of plastic comb to keep out the birdies (and the bats?).


The roof verge and barge board ready for capping, of which more later.


Also this week work started on the fireplace. A couple of brick pillars standing on that metre deep lump of concrete. We've run out of  our own reclaimed bricks so have had to go and buy a couple of thousand more from a nearby reclaim yard. We found some that match the existing bricks quite well. We were offered a consignment of Tudor bricks - yellow, very narrow. The fireplace would have looked great but I'm not sure a Tudor chimney piece would sit well in a Victorian barn. And yellow? The owner of the reclaim yard was most disappointed when we turned them down.


Hogging going down over the hardcore


Whacked hogging, as per Delia's latest recipe.


One thing about being in the country, the weather and the seasons have a bigger impact on life. (He said, sitting in a suburban 3 bed semi.) But we do spend a lot of time there ...
Harvest time – view of the field out the back of the barn


Harvest time – the view from the scaffold. Don't you just love it?  Sorry about the piles of offcuts in the foreground. Not too sure what to do with them. I'm loathe to simply burn them on a bonfire but some of it is treated timber and I'm not sure it's safe to put treated timber in a woodburning stove. Have to make some enquiries.


Some of the issues we've faced this week have included ceiling heights, location of drains, floor construction, external cladding.

Unfortunately we've discovered the south east door overlaps the projected ceiling in the family room. We explored lowering the ground floor level, raising the first floor level (and hence the ceiling height) and reducing the size of the window/door. Eventually decided on the latter. I'd like to blame the dreaded CF (I can't bring myself to speak its name) but I can't because there's no chalk in this section of the barn. (Oops, almost said it.) It has come about because we preferred to set the floor level in the whole of this end of the barn, the family room and study, to be conitinuous rather than have a step up as you move into the study. Although I'm sure the CF is to blame indirectly ... if only I could think of the reason.

We're also agonising over the drains (as you do). In the utility room, we still haven't agreed a layout for the room but the builder needs to set the drains in there in order to get on with the oversite. We'll see.

Thinking about first floor construction – we need to order joists, joist hangers and steel beams. Also, we need to investigate sources of feather edge weatherboarding.   We've decided on black stained softwood rather than hardwood because it's just so much cheaper. Which means I need a couple of schedules, lists of detailed requirements, to be able to request some quotes.

And Finally

Saturday 8 October 2011

Week Twenty Two - Hardcore Dumpering

Now that the birdcage has been removed work can start on the inside of the barn. The barn looks fantastic like this. It would be great if there was a way to retain it like this but we can't. We'll keep what we can, but this is a barn conversion, not a barn restoration. It is being converted from what it is to something else which means something has got to give.


Some of the internal walls are load bearing so have to have a proper foundation.


Got a couple of machines in to save the guys having to do loads of digging and barrowing. (Not just for my benefit, honest)


Dumpering it in is quicker than barrowing. The cost of the mandays saved pays for the hire of the machine. At least, that's the theory.


Short back and sides please.


That'll do nicely, thank you.


To prepare a delightful ground floor you first skim off the top layer of soil and discard.  Pour in a lashings of hardcore - be generous, but don't overdo it. On top of that you add a dash of blindng which can be coarse sand or, if you're fortunate enough to have it, hogging. The next bit is best done by hand (always more pleasing) but if your guests are arriving soon, you can use a whacker plate, one of those handy labour saving devices. Beat the blinding till a really firm consistency is achieved.This is the most important part of the process and can make the difference between a truly sumptuous ground floor and something rather ordinary. Next comes a coating of damp proof course - DPC to the cognoscenti. If you want a really solid result you can add an optional layer of steel reinforcing mesh. Top the whole thing off with cement and smooth the surface with a knife. If you haven't got a big enough knife, lengths of 2 by 1 batten will do. Leave to set overnight, and voila - a firm base (oversite) for the rest of your floor construction, of which more anon.

Dumpering in the hardcore

Hardcore ready for blinding.


The doorways are the sole remaining sections of the perimeter of the barn which need a solid foundation.  Now the birdcage is out of the way they can get at them.
Pouring concrete in doorway foundation


The infamous rammed chalk revealed yet again. Looks like icing, doesn't it.


We’re having a double sided fireplace in the middle of the barn and the structural engineer has included the brick pillars of the fireplace as load bearing supports for the first floor. Basically the fireplace will hold up one end of a steel beam which will, in turn, hold up the first floor joists. The brick fireplace will not only have to carry the flue/chimney, it will also carry half the first floor. Perhaps we should call it Atlas. Anyway, it needs a good solid foundation. When the guys began to dig out that area of the chalk floor (as permitted by our planning permission, I hasten to add) guess what they found.


Remnants of a brick wall just below the surface. Quite apart from the curiosity of such a find, it did imply that the soil in that area couldn’t be regarded as  virgin, undisturbed subsoil.  So the structural engineer insisted on a 1m deep slab of concrete, 3m wide by 2m long, for the foundation for the chimney.


When we saw the hole we did think we might scrap the fireplace and keep it as a swimming pool. But that might cause problems with the first floor joists (like, there's nothing to hold them up) so, reluctantly, we gave that up as a bad idea.


The doorway between the kitchen and the family room goes through the internal plinth wall.
Now you don't see it.


Now you do.
Note the change in levels. The site slopes north to south but the difference in levels here is mainly caused by the requirement to retain the chalk floor which is in the middle of the barn.


Our phriendly feasant standing guard over our skip.


And finally,