Sunday, 1 January 2012

Week Thirty Three - Half Board

Feeling a bit like the Gas Board. No sooner is the concrete down than here we are digging it up again, rearranging the utility room cloakroom drains.


Bit sad, but it has to be done. Battening the internal wall frame in preparation for plaster boarding, at which point the open frame will disappear. But we've decided that most of this studwork will remain visible, so the battens are being set back from the front edge of the timbers.


The door linings have been primed - white.


The steel channel under the wall plate over West door has, at last, been put up. It's one of those jobs that always get left for later. And difficulties with the plates at each end of the channel didn't help.


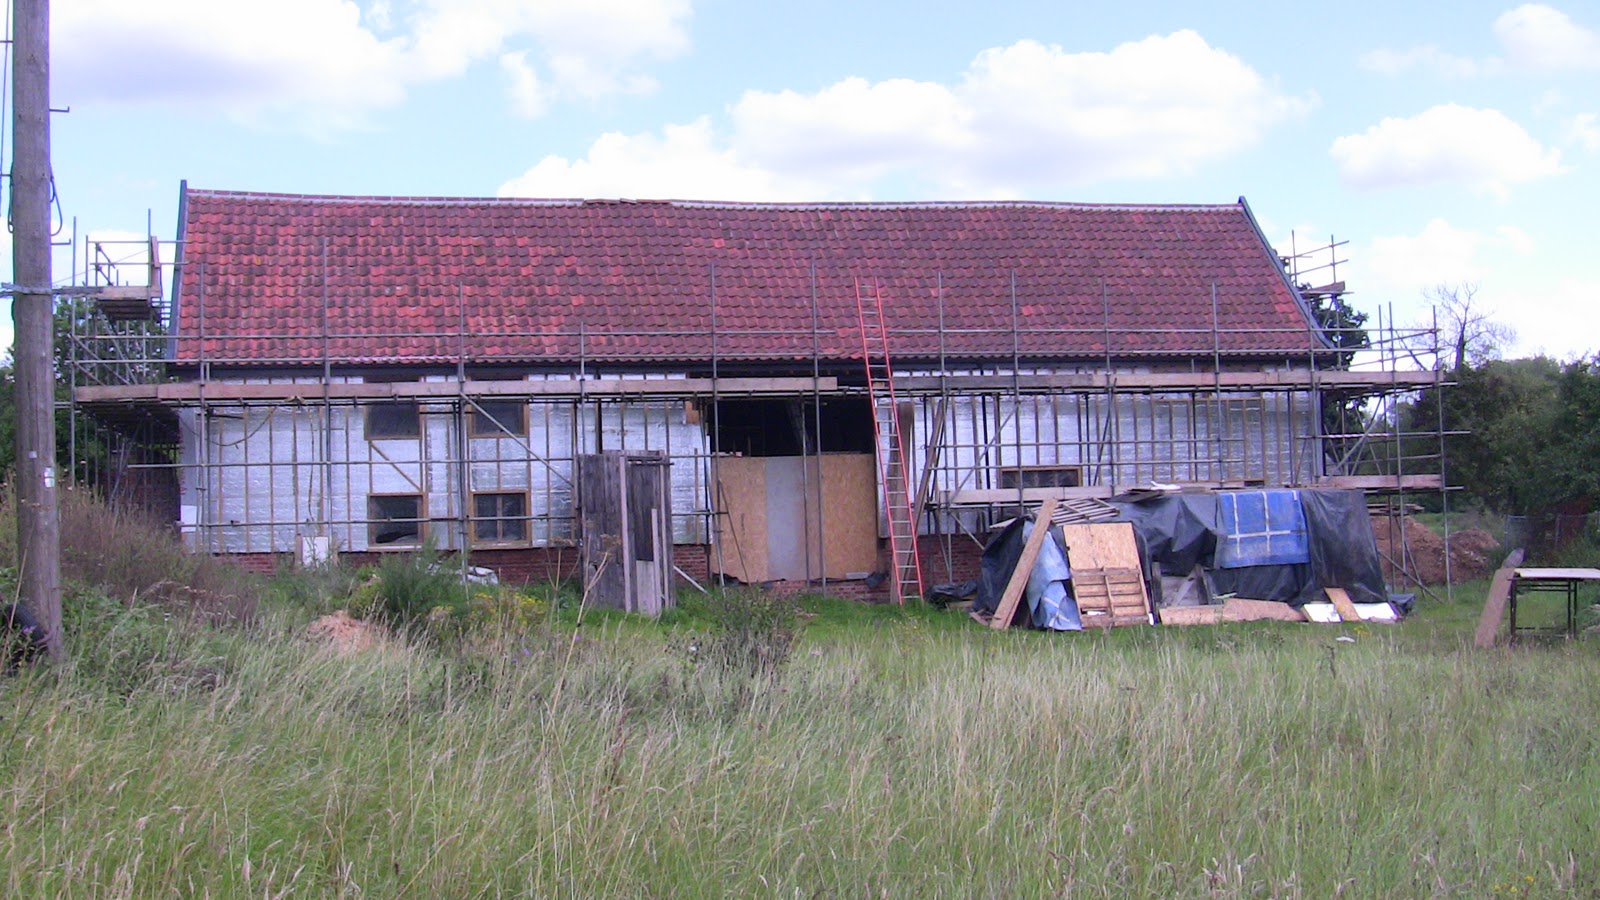
Weather boarding South end is now all in place. Beginning to look like a barn again, rather than a Christmas cake.


Now that the steel over the West door opening is in place ...


... the West door frame can be fitted. It will be two bifold doors at the bottom and four large panes of glass at the top.


Meanwhile, electricity 1st fix continues apace


Installation of the weather boarding has moved to the West side of the barn. Did you know that they start from the bottom and work up? Each board overlaps the board below and is nailed along it's bottom edge, clear of the board below. That way, as the board expands and contracts due to the weather it is free to move without putting strain on the fixings and without disrupting the structure. Clever huh?


Issues we've had to deal with this week include
- Still agonising over what type of doors - framed ledged & braced, solid veneer, suffolk latches or lever handles blah blah blah
- Showers, what kind, surface mounted or recessed, what manufacturer, and what about a shower bath
- Utility room layout, what units to put where, what kind of surface, how to line up the sink and washing machine with the way the drains have been put in - oh dear
- similar anguish over the Kitchen layout, and what cooker to get
- Pipe runs for heat recovery units, ducting and and boxing in
- Water quality, how to deal with the high Iron and Manganese results from the borehole tests

And finally


Friday, 23 December 2011

Week Thirty Two - A week of Firsts

Feeling very excited this week. Lots of Firsts. Lots of new things starting and the impression that the conversion is now transitioning to something more closely resembling a new build. Of course we expect more gotchas, but it feels good.

First section weather boarding has at last started to go up.


Under the boards, and over the celotex, is a breather membrane. It's a bit like paper but made from some sort of magical fibre that lets the air through and keeps the water out. Bit like a GoreTex jacket - allegedly ... Must admit, when I read that sort of stuff I get the old "and if you believe that you'll believe anything" feeling. Just called me an old sceptic - everybody else does. Anyway, the plans say breather membrane under the boarding, so breather membrane it is.


 Another first, and a big big step forward - plumbing 1st fix. They run the pipework, copper and plastic, through walls, under floors, through first floor joists, wherever. Once all the plastering is done they 'll come back and (you guessed it) do 2nd fix That's when they connect up all the bits at the ends like taps, sinks, showers and stuff. (Stuff would include all the unmentionable things like S bends, drainage traps, cisterns, close coupled toilet pans, soil pipes. But to avoid any scandal we'll take that as read, OK?) Here we see hot and cold water pipes and, I think, pipes feeding the underfloor heating.


Unmentionable stuff in the ensuite bathroom to the main bedroom.


Slightly less unmentionable stuff for basins. The pipe runs will all be covered once the stud wall is plastered over.


Much more acceptable in polite society is the materiel of electical 1st fix, which also started this week. (Another big big step forward. BTW, did you know that Cambodian for big is 'tom'? And very big is 'tom tom'. So we're definitely having a tom tom week.)

Cables run through the stud walls to switches,


... and to sockets. The terminal components of sockets, switches and light fittings will all be installed at 2nd fix when the walls are finished. It's beginning to look like a real house under construction.


We're a long way from hanging doors but the door linings have been assembled ready for painting and nailing up in the doorways.


Outside, final repairs to the brickwork have begun. The old brickwork needs repointing and damaged bricks have to be cut out and replaced. They start by removing the worst bricks and then raking out the old mortar.


It's interesting how modern the raked out bricks look. The mortar is no longer flush with the brick and the effect is quite startling.


Here's a section of new brickwork with new, flush, mortar next to an old section of brickwork where the mortar has been raked out ready for repointing. 


Issues that have exercised us this week have included: how to push on with the garage & plant room where the water filtration, heat pump and equipment will be located; do we use rockwool or sheep wool between the studs; where to put the electricity consumer units (fuse boxes), inside or out; whether to put lead over the windows to protect the window frames from the weather, or not; where to put the keypads for the burglar alarms; how to get the pipework from the ground floor to the first floor; how many loft access trapdoors do we want (2 or 3). Ooh la la, this is doing my head in.

And finally


Monday, 19 December 2011

Week Thirty One - Just Flue by

This week great progress with the chimney/fireplace inside, and the flue outside. The Planners don't allow a brick chimney on the roof of a barn so it has to be a steel flue. And it's not a good idea to take the flue out through the ridge - you'd have to cut through the ridge timbers which would weaken the structure.


So the flue exit is located a couple of tiles down from the ridge.


The wood burning stove is directly beneath the ridge, and the optimal run for the flue would have been straight up to ensure a good flow of exhaust gases and smoke from the stove. To get out via the second tile down from the ridge, the flue has to have a couple of bends in it. Had much heartache working out an acceptable route for the flue which would have minimal impact visually, be within the constraints imposed by the Planners, and have the least bends.


The West window and door frame was delivered this week. Just have to get it painted and the builder can put it up. We've decided on bi-fold doors for this one. Not sure how that's going to work.


They've started preparing the inner side of the walls. Battens have to be nailed or screwed to the studwork to provide a level surface for the internal insulation and plasterboard. Takes an age and uses miles of batten.


Studwork for the new internal walls is built onto existing timbers.


This is going to be a shower room for the bedrooms in the north end of the barn. Looks light and airy right now but when the plasterboard is nailed up it will be rather dark - no windows.


At the other end of the building, the walls to create the ensuite shower room in the main bedroom are going up.


The back stairwell. No stairs at present, just ladders. Would be cheaper, I guess, to leave it like that. Might be difficult getting stuff up there, though.

The chimney takes up most of one wall in bedroom two. It will be plastered over, of course, and maybe a cupboard will be built round it if funds allow.

From the double height area, the fireplace, with its catenary sides, and the rectangular structure of the chimney behind in bedroom 2.


Here you can see how the fireplace pillars have a structural role holding up the first floor joists, not to mention the steel beam at the back.

This week we've started preparing for first fixes next week - plumbing and electrics – all very exciting

And finally


Thursday, 15 December 2011

Week Thirty - Hot Air

The Queen’s birthday is marked by an RAF flypast over Buckingham Palace. We chose to mark current progress with the barn by  arranging a flypast of three vintage aeroplanes over the Barn. 
(Just kidding.)


We're having Heat Recovery Ventilation installed. The idea is that the barn is designed to be pretty much airtight and all ventilation ducted in and out via a couple of heat exchangers. As the stale air is pumped out of the building it warms the air coming in. That way the air is changed regularly (way in excess of building regulation requirements) while the heat in the air is retained in the building. Cool huh? Or should that be Warm huh? The HRV kit was delivered this week. We had a last minute change of heart concerning the ducting. The original design was based on rigid ducting, essentially 4 or 6 inch diameter pipes rather like drain pipes. We couldn't see how to route that kind of ducting round the barn given the contraints of an old timber frame with beams and trusses all over the place, not to mention steel beams in the ceilings. So we opted for a system using flexible ducting, the red stuff.


Another view of that diagonal timber across the doorway which had to be cut to let us get to bed.


The plywood on the first floor is fixed to the joists using something called ringshank nails. Whereas ordinary nails have smooth shanks, these things have raised rings along the length of the shank. I think the idea is that the corrugation makes it difficult to get the nail out once it's driven home. Bit like the twisted square nails used to fix joist hangers. Bet you didn't realize that nails could be so interesting? Personally, I find them quite riveting.


The chimney in the centre of the barn is going up. The brick and blockwork will be covered by plasterboard and there will be a facing of bricks visible from the double height area.


The internal domestication of the barn took another step forward with the delivery of the door linings. More learning curve stuff - door linings, architraves, door stops. Not to mention door furniture (handles and locks to you and me) and of course not forgetting butt hinges, washered or ball bearing.


Timber frame against the OSB. Some people choose to put all the insulation on the outside and keep the frame exposed internally. The problem with doing it that way is that the barn tends to bulge. The insulation pushes the weather boarding outwards by the thickness of the insulation deployed, say 100mm or even 200mm. We’ve chosen to have some of the insulation outside and some inside between the studs. There are pros and cons to both approaches and who knows what’s the right thing to do. Still struggling to decide whether to use sheep wool or rock wool between the studs. Probably come down to cost in the end.

King post over the central doorway as seen from the outside. I think it looks great. You can see the original carpenters marks on the timber.


New studwork in the roof space over the back stairs. As if there wasn't already enough timber in the barn, we're adding loads more - for new walls and ceilings.


Partition walls and ceilings over the back hall and staircase. What staircase, I hear you ask. Good question. Watch this space.


And finally