Thursday 24 November 2011

Week Twenty Seven - Bressummers and Joists

Loads of stuff going on this week. First floor construction steaming ahead, chimney going up, gutters round the roof and window frames delivered. Beginning to feel more like a real house. Or perhaps I'm not allowed to say that. More like a converted barn, with all the charm and character of the original building preserved for generations to come. There.
Talking of charm and character, where else would you see a diagonal stud right across doorway?


As described previously, here's a steel beam with  nog insert and joist hangers nailed into it

And first floor joists resting on Stonehenge resting on the sole plate on the plinth. Interesting load paths here. (Another term I picked up recently - load path. How the load of the first floor, in this case, gets transferred down through the structure. Ultimately it reaches the foundation and we don't care about it after that. There's probably some poor guy in Australia holding it all up.)

Alternative load path - joists hanging off a beam which at one end is bearing on a block wall. The blocks are individually quite weak with a crushing strength of about 3.5 Newtons, whatever they are. (Something to do with apples I believe.) So the point where the beam rests on the wall is made up of engineering bricks to take, and spread, the load.

Just looked it up - a Newton is the force required to increase the speed of a 1kg mass by 1m per second, per second. Clear as mud? Apparently it's approximately the force needed to hold up a 100g weight, ie an apple. Curious eh? So I can see why you need engineering bricks to hold up a steel beam. Obviously a bunch of engineers is going to be stronger than 3 and a half apples. Obvious or what?


They've started to build a bedroom wall upstairs, under one of the trusses. The truss will be visible from both bedrooms either side of the wall.

The bits and bobs for the flue have arrived


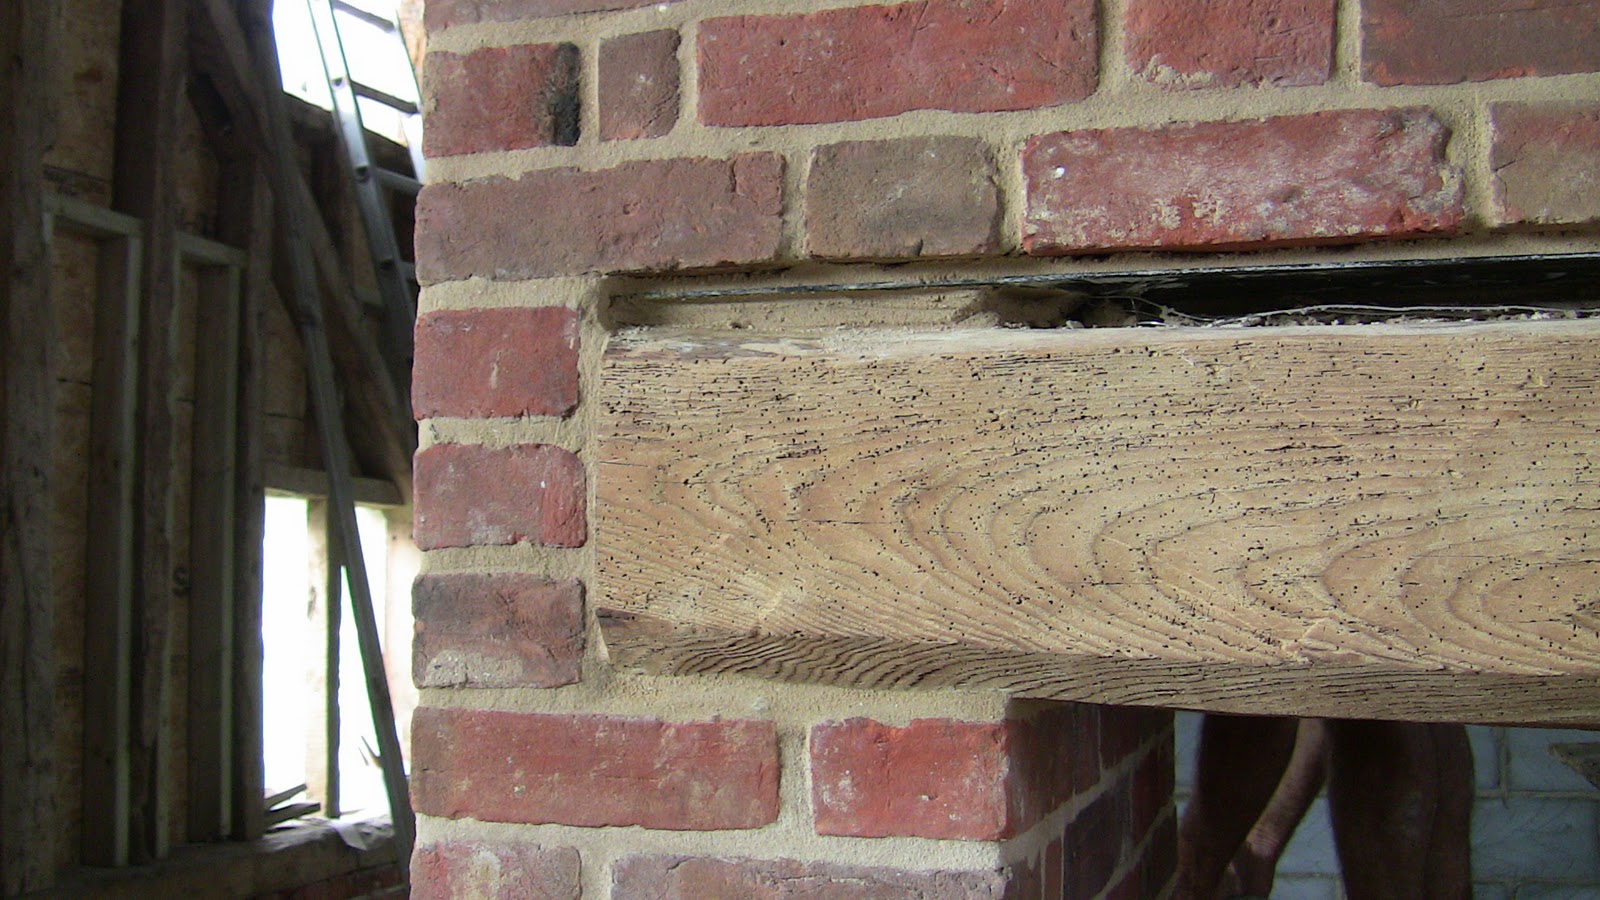
A bressumer over the fireplace. It's cut from one of the beams taken from another part of the barn. (Found a use for it.) It's elm, apparently. Had it sandblasted and treated. Come up lovely hasn't it? There's also one on the other side of the fireplace, cut from the same old beam.

I'd never heard of bressumers before. (And me a born-again country bumpkin. Whatever next?) Anyway, Wikipedia, the fount of all knowledge (some of it a bit dodgy) says a bressummer, or breastsummer, is a beam. Hmm, tells me a lot. Elsewhere on t'internet I've found that the word comes from the french sommier, meaning beam, and is a kind of lintel, ie a beam spanning an opening below it and supporting some structure above it. Like the mantle over a fireplace?  The difference between a lintel and a bressummer is that a lintel would be used where there's a door or window in the space below, implying that the lintel mustn't flex in the middle, whereas a bressummer spans an open space (like a fireplace!) where it doesn't matter if the beam flexes a bit. And if you believe that you'll believe anything because if, for example you've got a brick panel above the opening it has to be supported by something that doesn't flex, otherwise you'd have bricks falling on your head as you poke the fire. Not good, unless you don't mind wearing a hard hat indoors.


The engineer has insisted that the bressummers be protected from the loading of the brickwork above . So maybe there's some truth to the bit about bressummers and flexing in the middle. So we had to scour the region for the right size of lintel, a catnic steel lintel, the edge of which which is just visible above the bressemer.


You can tell it's an elm bressummer by the pigeon-breast pattern on the surface, so they tell me. It's also riddled with woodworm - now treated and full of character. Or should that be characters? (Poor little woodworms - going about the business of being a woodworm and along comes a nasty property developer ...)


The fireplace is going up


... and the flue is going up the chimney

Here you can see how the catnic lintel overlaps, and is bearing on, the exterior skin of bricks so that the load of the brickwork above the lintel, ie above the bressummer, is transferred to the side brick pillars. Clever load path huh?


Up on the roof the gutters are being fixed to the fascia boards


And the first batch of window frames has been delivered. All bespoke and not a standard off the shelf item to be seen. We opted for Douglas fir as a compromise between softwood and oak. Once they're painted and installed we'll get the glaziers to come and measure up.


And finally


Sunday 13 November 2011

Week Twenty Six - Of Violation, Walls, Joists and Fireplaces

We had to go and buy some more reclaimed bricks for the fireplace/chimney. Barns don’t have fireplaces so this is obviously a bit of a violation of the ethos of the barn. But hey, you godda have heat ain’t ya?

Seems a shame to start breaking up that vast empty space with internal walls and floors but it has to be done. What do bedrooms, bathrooms, sitting rooms, living rooms, utility rooms have in common? They’re all rooms – with walls and doors and floors and ceilings – none of which exist in a barn. So, although we’re doing our best to maintain the barn as it was, we’re nevertheless violating its essential character. Breaks your heart doesn't it?


Steel beams are used to span wider spaces than a timber beam could. They provide relatively solid support to hang joists from. A timber beam that long would either flex too much in the middle or have to be so big that it would cost a fortune and/or be enormous. But the steels do need solid points to bear on. Here it's resting on a block wall. The point where the beam rests on the wall is made up of hard engineering bricks to spread the concentrated load of all the joists hanging from it.


At the other end the steel bears on a structural post. As luck would have it, at the very point where it should be attached by means of a pair of angle brackets, the post has an old mortice hole. So the brackets and the beam had to be notched into the post - but not too far, as that would weaken the post. Compromises compromises, all I see is compromises.


Of noggings and Stonehenge. The first floor joists need to rest on something at either end. Our Engineer has specified a Stonehenge-like structure between the studs forming bases for the joists to sit on.


With one end of the joists resting on the Stonehenge structure (perhaps that should be Woodhenge, although they've already got one of those under the sea off the coast of Norfolk) the other end of the joist hangs off the steel beam. The sides of the steel beam are packed out with noggings for the joist hangers to be nailed to.

Nogging. A nog seems to be piece of wood inserted into masonry or timber frame to provide something to hammer a nail into. A nogging is used to fill spaces between studs or other framing members. So the timbers packing the out the steel beam should perhaps be called nogs. This is doing my noggin in.


Joist hangers. The French call them sabots, which also means clogs, as worn in Holland. Bet you didn't know that your first floor is held up by clogs, did you.


You can't nail up the joist hangers with any old nails. Oh no, you have to use something called square twisted nails which, as their name suggests, are square and twisted - kind of. They act a bit like a screw - as you hammer them in they rotate and are murder to get out again. Which is probably what you want. I find it reassuring, as I lie in bed at night, to think that my life hangs not by a thread but by something that's square and twisted. Come to think of it, that could be a description of me - square and twisted.


The piece of steel, in the shape of an inverted U channel, to support the wall plate over the west window has been delivered. Just have to put it up now ...

We had a couple of old beams in the barn which weren't doing anything structurally .


So they have been taken out and put aside in case we can make use of them elsewhere in the barn. They're about 6in by 6in, by 3m long and apparently made of elm. Serious lumps of wood which would cost arms and legs if we had to go out and buy them. Let's hope we can find a use for them.


Construction of the fireplace and chimney started, using the new old bricks.


The fireplace pillars will provide structural support for steels and joists


A big heartache this week has been the design of flue – what sort of flue liner to use, how to route it up through the roof, what kind of reinforcing it needs for the brickwork over the fireplace. The plans are not specific about the details so we've had to get input from our engineer, the builder, various flue component suppliers, installers, uncle Tom Cobbly and all.
And finally


Monday 7 November 2011

Week Twenty Five - Roof done, floor round one

Two major milestones passed this week - we now have a floor under our feet and a roof over our heads. That is to say, the roofers have put the tiles back on the roof and the last of the oversite concrete has been poured. In a way the oversite is the biggest difference. Although there's still a lot of stuff to go into the floor construction (100mm celotex, underfloor heating pipes, 70mm sand-cement screed, floor finish, be it ceramic tiles, wood or carpet) at least we now have a continuous concrete base all over. No more dirt floor. No more rammed chalk. Just a solid concrete surface to walk on. 
Here's the reinforcement of the sitting room floor - about half of it is over the rammed chalk.


And concrete going down over the reinforcing mesh.


The Planners granted permission for one roof light, and here it is over what will be the back stairs. It's difficult to get your head round just where this bit of roof sits in relation to the interior. But the plans say it's over the back stairs so it must be right.


The capping at the north end of the main roof. Doesn't look much, after all that heart ache. But since it's iroko it should last a good few years. If not, I'll be demanding my money back in fifteen years time.


The insulation we've put in means that the roof is a bit higher and wider than it used to be. That, plus the fact that some tiles were damaged, or got broken in the removal process, meant we didn't have quite enough tiles when it came to putting it call back on. So we've had to go out and buy some more. It's impossible to get the same tile but, with a bit of hunting around various reclaim yards, we were able to find a pretty close match. They're not exactly the same colour nor exactly the same size but they'll do. The roofer said they were OK so that's good enough for me. Rather than try to mix the bought in reclaimed tiles with our own, it was easier to do one complete projection roof using the 'new' tiles. You can just see the difference, once it's pointed out, but it's not bad.


The west roof done. Great, isn't it?


The weatherboarding has arrived. We agonised over hardwood or softwood, painted or unpainted. In the end we went for a good quality softwood, painted. It seemed a reasonable compromise of cost and time. With my amateur quantity surveyor hat on I had to calculate how much we needed to clad the barn. Hope I got it right ...


The sloping site and the rammed chalk in the middle of the barn mean there are steps down at both ends of the barn.


Now that the ground floor oversite is done, attention is turning towards construction of the first floor. That means ordering joists, joist hangers and steel beams. The steels arrived this week. More learning curves to clamber up. What's a joist hanger? Someone who hangs joists? And what have the joists done that's so terrible they deserve hanging? We shall see.


We're building up a heap of hardcore. All those smashed tiles - breaks your heart, especially when you know how much a reclaimed tile costs. Ah well. It's only money. Could be worse ... couldn't it?


And finally